Pages

Saturday, November 24, 2012

Autumn Art

Now that fall is officially over, I thought I would share my burlap wreath I made about a month ago. Apologies for not posting it sooner...I'm sad that I couldn't try to inspire anyone to make their own for the season.  Boo to me for waiting too long.

This wreath was one of those Pinterest inspired ideas of course.  I came across this little nugget below and loved the casual look of it.

http://tarahlowry.blogspot.com/2012/08/diy-burlap-wreath.html

I found a few Jo-Anns coupons and headed to the store to get me some burlap and a straw wreath.  I already had a ton of pins leftover from high school sewing class days that never got used.  Here are what my supplies looked like. 


I started out following the directions on the blog post above, but ended up making a few adjustments halfway through which I'll explain once we get there.

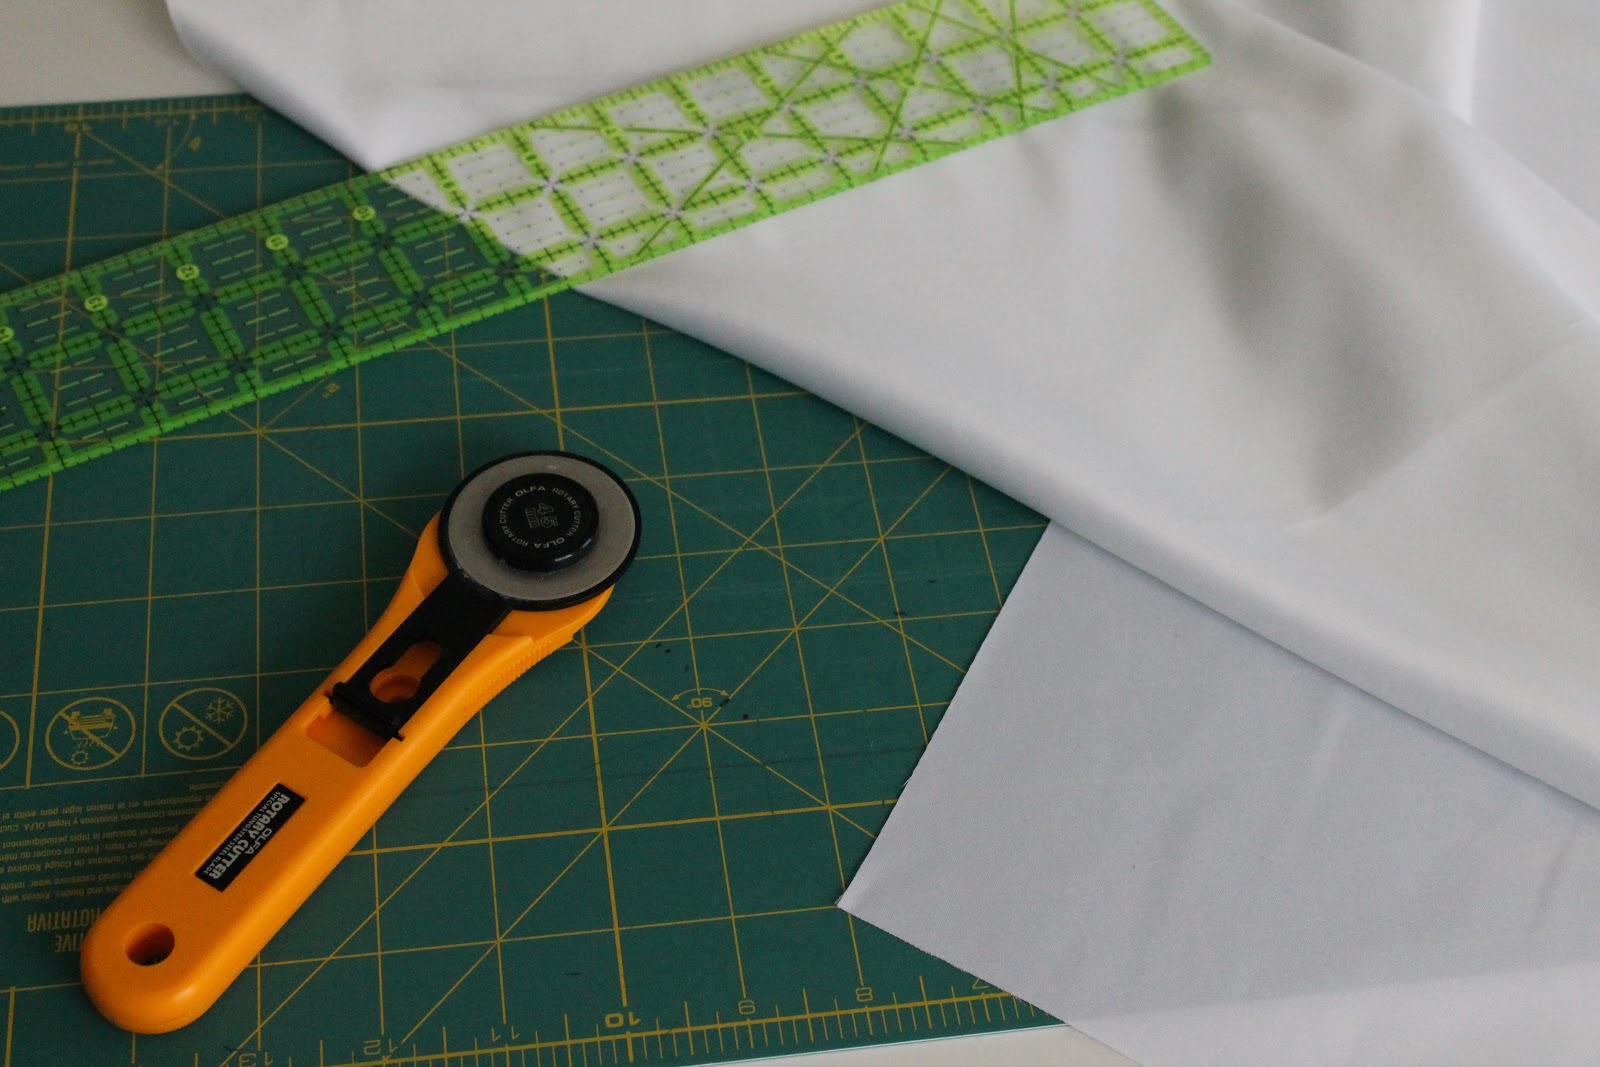
To start, the cutting of the squares was quite tedious, but the rolling and pinning turned out to be fun as you slowly got to see the wreath taking shape.  I used my trusty cutting mat and rotary blade to cut my 4.5" squares.


The first round of pinning on the back squares was simple enough.


Here is what it looked like after two full rounds.  This is the side that hangs against the door.


I flipped it over and began pinning the same rolled squares to the top edges of the straw, but was a little disappointed with how it was turning out.  It looked a little too neat and orderly and I wanted more messy, funness.

 
I read a little further down the blog post and tried using the roll and fold method that was used for the last round on the blog wreath.


It was exactly what I was looking for.  I decided to use that on all three of my last rounds.

Here is what it looked like working on the outer round.


Next was the inside round.


 And, finally, the in between round.


Here is the completed wreath.


Now it was time for embellishments.  After scrolling through some other random blog posts, I stumbled upon this one, which explained how to make a burlap flower bouquet.  I thought it would be fun to create a few of these to put on the wreath instead of a bow.  It definitely needed more jazzing up than a simple bow.

I followed the tutorial and made three roses.


And four button-eye daisies.


Next step was to pin them onto the wreath and cross my fingers it looked good...

I think it actually turned out better than I was expecting it too!  Here is what the finished product turned out looking like hanging on the front door.


And close up!


Yay!  Next up the Christmas wreath!

Friday, November 9, 2012

Like A Boss

Chris' room finally received its long awaited make over while the rents were in town.  The color he picked was actually the first color I thought about for my room, but when I decided on going even brighter, he quickly claimed it.  As soon as we started the brushing the color on the walls, I could knew it was the perfect office color for him.

Here is how the room looked before we moved anything out.


 A little crowded, right?  And not very inspiring.

I had a fabulous time puttying all the little tack holes from the papers on the wall btw.

Here it is all cleared out and primed.


And then finally we got to paint the wonderful new color on the wall.  Since we don't have a Miller paint here which is where Divine paint is located, we had Sherwin Williams mix up the color for us in their Duration paint.  The office color is Divine Reflection.  They have done an amazing job every time getting it spot on to the original color.

I didn't take any empty room pictures because everyone was so eager to get it put back together.  After a few days of Chris purging and organizing, here is the finished product.


The dry-erase board was added to allow him to sketch out ideas a little easier.   We made a trip to Home Depot and got the $13 board and about $18 worth of trim.  Looks much cleaner than the papers all over the wall I'd say.  And yes, he is working on a knitting project for me currently if you were trying to read what he has penned on there now.


Next improvement was to take his three year old desk that was getting a little worn on the top and give her a small face lift.  I used one can of black spray paint to cover up all the marks on the top of the desk.  Chris picked up a clear sheet of plastic at Lowe's and had them cut it there to the desk measurements.  Slapped it on top so now the desk won't get ruined again.


And the bookshelf is all organized and refreshed.  Don't mind the creeper in the photo.


What was that?  You wanted a closer look to know what kinds of books Chris reads?  Here ya go!


Oh wait...my bad.  Those were my books.  Here is what Chris finds interesting...

Politics and how not to rule a nation.


Rocket Science


Every religion in the world


Trigonometric DELIGHTS


And his own collection of brilliant ideas to save the world.


Seriously, if you're ever curious what cymatics is, just ask Chris and he can give you an in depth lesson.

So there you have it...a brand new office for my main man.  Can you tell he loves it?


Thursday, November 8, 2012

Best Parents EVER

A few weeks ago my stupendous parents took a road trip here to Utah to bring us a full car load of wedding decorations, random boxes left at their house and of course refills of laundry detergent, hand soap and toilet paper.  You may laugh at that last little bit, but let me assure you that I have not purchased these items once in the last four years...and I don't intend to start.  Why would I ever go and purchase them myself when there was a perfectly good house across town that was fully stocked with supplies that had been bought for 50% off?  I mean seriously, right?  I'm not expecting this trend to change, just because I'm in Utah.  It's only another 15 hours.

Not only did they bring all the goodies, but they brought Papa John with them as well.  You all know what this means.  We now have an indoor pool, four more bedrooms, and a kitty condo.  All right, not really, but the kitty condo would have been nice.  Maybe next time.

What we really accomplished was painting the entire upstairs hallway, complete with eight door jams, eight doors, and an insane high spot that for about ten minutes I feared my father's life as he stood precariously on the rail and stretched to create a perfect cut in on the ceiling.  I swear he is Superman.  And no, I did not take a picture because I was too busy not looking.

Here is what the hallway looked like pre paint job.


BOORRRINNGG.

Now check out how stellar and cool it is.


I love how much brighter it is now.  White trim, doors and ceilings amaze me at what a difference they make in a place.  And if you are thinking that there really isn't much change...there really is.  You just need to be here to see it.  Pictures don't do it justice.

Our "B E N C E" photo was a wedding gift courtesy my wonderful friend, Anna.

Since Papa John and Mama Karen were only here for ten short days, we didn't go as crazy on the painting as last time.  We did, however, get one more room done which I'll share with you guys soon.  It's almost as cool as my craft room...almost.

Huge shout out to my parents for making the trip and hanging out with us.  Now if only I could convince Mary to get down here to finish the bonus room ceilings...

Sunday, October 28, 2012

Wedding Slide Show


Just thought I would share our wedding photo slide show with everyone who hasn't seen it yet on Facebook!

Check it out here!


Tuesday, October 23, 2012

Ittle Bittles is Live!

That's right!  My Etsy shop is finally online!  It's not much yet since I only have one item on there, but it's actually live!  More products will be coming soon now that house projects are winding down and the weather is a little chillier.  Knitting is always much more fun wrapped in a cozy blanket.

The main factor in finally getting the site live was that before I moved into my new craft room, I didn't really have a good place to take photos.  And we all know photos sell the product.  When I talked about it with Chris a few weeks ago, he suggested we create a studio of sorts that could be easily put away, so it wouldn't take up too much space.  I concurred.

We figured that a dowel with a crank that was suspended out from the wall a bit should do the trick.  After a fun trip to Home Depot and Jo-Ann's, I came back loaded with goodies to get it going.

A few of the things in this photo were actually used to hang the burlap board.


Unfortunately, when I got home I found out I bought the wrong hook because it didn't have a point.  Whoops.  Chris got the flat metal pieces you see above to try to and make a work around, but that failed because it was ugly and tough to get everything sitting right.  I headed to Sunroc down the street and found those same hooks, but with a point.  Lesson learned.

We sprayed everything white so that it would match and be pretty, then Chris got everything hung for me.  I had to do a little patchwork on the areas we messed up on earlier, but since I cleaned the can dry when I painted the room, I was out of the correct paint.  I found our little tester can which I used to cover the patches, but you can see that it is a little darker than the real paint.  I grabbed a quart of the actual paint last week to fix it properly, so try to ignore those for now.

Here she is after Chris finished attaching to the wall.


Next step was to cut the fabric I picked up at JoAnns.  I looked at all the different types of materials and settled on bridal fabric because it was heavy and had a little sheen to it.  Would serve well for a plain backdrop.  I got out my trusty rotary cutter and started slicing.  Seriously, what did I do before I had this thing?


I took duck tape and attached it to the rod then wound it up to see if it would work.  Yay!  It stayed in place!


Here is what it looks like down.


And here it is as my new studio during the first photo shoot!


Now that you've seen the behind the scenes magic, head on over to my new shop and buy some duck booties!


Friday, October 19, 2012

Guest Suite

In honor of my parents being in town and actually using the guest room, I thought I would finally show you all the end product.  Since the room had been previously painted the wonderful color of Divine Buttery when I was originally using it as a craft room, it already had the means to be an amazing Oregon Duck themed room.  When Chris first moved in Mary hung a few Duck photos on the wall, so naturally, everything Oregon related that I brought with me in the move went into that room.  It was kind of a lot, so I'm giving all my Beaver friends a heads up that you may need to rent a hotel room if you decide to come visit us.

When I finally got the room all situated I realized there was one thing I was missing...a duck decor pillow.  I really needed one to complete the vibe.  I considered looking online at the Duck store, but then I remembered I actually had some Oregon fabric on hand already.  Knowing Chris and I would be starving when we got to our hotel after our wedding night, Mary hooked us up with an Oregon fabric lined basket full of delicious goodies to gobble up.  It was heaven.  I dug the fabric out of my collection to see if it was big enough to work.  Yep!


I knew I had a throw pillow that wasn't being used as I had recently retired it from a knitting experiment I created a few years ago.  The knit pillowcase just wasn't gonna cut it in this house...although I may try again with a fresh pattern now that I have a new palette to work with downstairs.  Anywho.  Here's the pillow.


Exciting, right?

Next step was to figure out the size I'd need to cut the squares.  Some quick measuring revealed I would have about 2 extra inches of fabric left over.  Luck was on my side.

I got out my trusty rotary blade and went to town.


Next step was to put the two right sides together and sew a half inch border around three sides, only leaving a small gap for the pillow to slide through at the bottom.  Then turn it right side out and voila...my pillowcase. 


All that was left was to stuff the pillow in and sew the last small section together.  Here is my sweet new Duck pillow!


Now for the final room reveal.  To remind you of what the empty space looked like to begin with, here it is, complete with striped walls.


And now here it is all Ducked out!


It may just be my favorite room in the house for obvious reasons.  I think now that my parents are here it may be the kitties favorite place as well.

Dwight looks very Sphinx-like on the bed.


And Farrah loves her grandma's suitcase.


I hope everyone wants to come visit us now that they know what an awesome room they get to stay in!!!