Pages

Tuesday, April 23, 2013

Square Foot Gardening

I decided to try something different this year.  I'm giving the method of square foot gardening a try.  After doing a little research, it just seems to be easier to plan and space.  It seems that you can also fit more veggies in as well.  Win, win, I say.

I got all my planning done a few days ago and am pretty happy with how the beds turned out.  I managed to fit all the veggies I wanted to do this year in and some are in abundance.  Good thing we have that community garden here in Springville, so the extras don't go to waste!

Most of the planning revolved around planting times.  Since I only have two beds done, obviously the earlier things like lettuce, peas, and cabbage need to go in those.  After that I based it on plant height and what veggies partner well together.

Here are my four boxes.

BOX 1

BOX 2

BOX 3

BOX 4

I'm really hoping the weather stays tame for the beginning of the summer for all my lettuce.  Last year was so crazy hot even in June when I arrived, I know they wouldn't have made it.  Fingers crossed!

So far I have one box planted.  I put in a few starters that made it through the cold snaps with me this past month.  The rest I sowed the seeds in directly.

Here is what box one looks like.


You see my fancy trellis that Papa John made me a few years ago is back in action.

Can't wait til all my little seeds start sprouting.  I'll post updates so you can watch it grow with me!

Sunday, April 21, 2013

Kitchen Curtains...finally

I got inspiration from May's HGTV magazine and decided to finally just go for it on those kitchen valances.  I'd been wanting to get that project done for quite some time as the windows take up so much space and made the room seem slightly empty.  You can see my naked windows here.


The article I was reading included a little snippet about easy trims to add to simple linen curtains that really jazzed them up.


I thought that the one using bias tape was perfect as I hadn't wanted to do one plain color, but didn't really want a big crazy pattern either.

Inspiration for my curtain rods came when I saw these awesome finials in The Land of Nod catalog.


They were a little on the spendy side, however, at $20 per set!  Yeah.  Right.  I figured that I could probably learn how to make that knot using real rope so I did a little research and found this awesome link with a video tutorial.  Took about an hour until I had mastered the monkey fist with some leftover rope from another project.  I realized that this was perfect as I already had two curtain rods the correct sizes, but they were a slightly different finish and shape.  Painting them and adding the rope would cover up their differences easily.

Within a few days I had measured my windows (80" and 36") and rounded up all my materials needed.


Get List

  • Linen fabric ($12.49/yard)......................................$31.25
  • Thread (two colors)..............................................$2.48
  • Quilt binding (two 3 yards each)................................$3
  • Rustoleum spray paint in flat white (1).........................$3.77
  • Natural manila rope (1/4in. thick, 50 feet)....................$5.60
  • 1in. clip rings (three packs of 10 at $3.99 each)...............$11.97
Grand Total                                                                         $58.07

Not too shabby I say.  I already had the curtain rods though, which can end up being a little spendy.  I found this awesome link that shows you how to make your own rod on the cheap if you are interested in saving cash.

Next came the doing.  I decided that I wanted a flat panel, no folding or pleats.  This would make the sewing process a lot easier.  I also opted for no lining as the linen was already quite thick and this was more for looks than function anyway.  I made the decision to sew the panel as I would for a pocket rod with a 3 inch folded top because I wanted it to still look professional.  When the sun shines through it, you can see where the folds are and I just thought it would look better overall.

I started off by measuring the width I would need.  The larger window was 80 inches across.  I wanted two extra inches on each side.  Then I would need the excess fabric for folding and creating clean edges.  I added another inch and 1/4 to each side.  Total width to cut would be 86.5 inches.

Then I measured what length I thought it should be.  Valances range from 15 to 24 inches normally.  I decided to go with 17 inches.  I added another 4 inches to the top and 1/2 inch to the bottom.  Only 1/2 bottom because my bias tape is 3/4 inch wide on each side.  This would cover the bottom seam and I didn't want to add extra bulk.  Total was 21.5 inches.

Got out my trusty cutting mat and rotary blade and went to town.


First folds were the two sides.  I folded and ironed at 1/2 inch, then folded it over again and ironed at 3/4 inch.


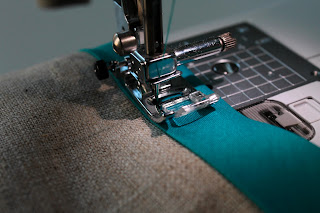
I sewed a straight seam with the left side of my foot hitting the edge of the fold.  Repeated on the other side.


Next was the top.  I folded and ironed 1 inch.  Here is a shot of my folding and ironing method.  I don't use pins, just take a ruler with me to the ironing board (yes, mom, I know you'll have a comment on that ruler).


Then fold over again at 3 inches.

Sewed down using the same method as before.


Had I actually made a full pocket rod, I would have made another stitch 2 inches down from the top.  This would make the 2 inch pocket for the rod to go in.


Next step is measure 17 inches from the top and fold.  I chose to measure from the top because I know my cutting is not always perfect.

Which of course it wasn't.  I had almost an inch extra on the bottom in some spots instead of my desired 1/2 inch.

Here is how I cut off the extra.  Super simple.  Just line up your clear ruler along the ironed fold and use your cutter to slice at 1/2 inch.


Always good to measure from the top!


I then sewed the 1/2 inch flap down on the bottom.

Next came bias tape.

To make a clean edge I folded and ironed about 1/4 inch on the end.


Then wrapped it around the bottom edge of the valance and pinned it in place.


When I reached the end, I snipped with 1/4 inch left, folded and ironed, same as the other side.


Thread color change and another line up with the presser foot


Snipped all my ends and round 1 valance was done!  I then repeated the process with the second smaller curtain.

Now for the fun part!  Monkey fists!

Here are my nice sprayed white finials.


I knew the bottom edge would show so I decided to paint the whole thing anyway.  Crazy, I know.

After a few tries I was cruising and before I knew it they were all done!


Yay!

Next was the fun hanging part.  I spaced my hooks about 4.5 inches apart in case you are wondering.


I think they turned out pretty all right...

Thursday, April 18, 2013

Where the heck is my spring?

I'm growing crazy anxious over here to start getting my little seedlings planted.  We keep getting one week warmth teases that get my hopes up.  I thought I was moving to a state with better weather...what gives?  It seriously has snowed here twice in the past two weeks.  Makes it very hard to leave the snugly comfort of heating inside the house to brave the mounds of dirt in the backyard and to work on projects in the garage...which is all I want to do!  Cabin fever!

So now that I got my complaining out, let me show you what I actually have been able to do on the last couple sunny days.

Chris and I ordered 12 yards of dirt to fill in the garden space after bumping the wall out another 3 feet into the lawn.  Then we got 6 yards of compost to eventually fill our 4 planter boxes and mix in for flower garden areas.  After MANY wheelbarrow trips we got the dirt moved.  Since we've only gotten enough pallet wood so far for two boxes, it's all I've been able to get filled.  Chris dug up the old sprinkler line and added a split for me so I can have a hose attachment in each bed.  They are gonna be so splendid once they are finished!

I got the second box done today and also added some of last year's leftover mulch to the pathways so weeds will stay out and I won't get muddy feet if it rains.  I cannot even begin to describe how much better it's gonna look when it's all done.  This yard needs so much work!  I blame the weed lot behind us and our lack of fence for its current state.  Not us.

Here is a progress pic.


And one with our stellar mountains.


Here is pretty much what it looked like last year, minus the giant hole.


The back corner will be a flat mulched space to put our new compost bin.  So happy we can finally start being Oregonians again...even this little bit!

Sunday, April 14, 2013

4/14 Heisting

Today I went heisting at Walgreens.  This is term Chris affectionately calls my couponing trips now.  Walgreens is where you can have the most fun by rolling reward points they give you on some of their products as well as manufacturer coupon printouts they give you for buying certain items on sale that week.  I saw that today's weekly ad had A TON of good stuff in it that I could get for free or make money on by combining their sale with my coupons and all the other stuff aforementioned.  Plus there were some other things that were just crazy cheap.

I started my trip out with the equivalent of $27 in reward money to spend.  This had all been slowly built up over the course of the last month from other deals being moneymakers.  After the trip I now have about $20 due to the items I purchased almost all giving me back rewards.

Here is my haul:


(3) Dr Pepper TEN Soda, 2 L
(3) Butterball Chicken Broth, 14.5 oz
(1) Original Starburst Jellybeans, 14 oz (not pictured because it may or may not be opened already) 
(1) Sweethearts Candy
(2) Oral-B Pro-Health Toothbrushes
(2) Crest Pro-Health Toothpaste, 6 oz
(3) Crest Mouthwash, 16.9 oz
(3) Nexcare Blister Waterproof Bandages, 6 ct
(5) U by Kotex Click Tampons, 18 ct
(1) Sleep Right Nasal Breathe Aid, 3 ct
(1) Morton Epsom Salt, 4 lbs
(1) Allergease Lozenges, 21 ct
(4) Glade Decor Scents Refills
(4) Nice! Toilet Bowl Tablet, 1.7 oz
(2) Comet, 14 oz

Total before coupons: $131.21

Total after coupons: $5.93 + tax (yeah, I miss Oregon)

95% Savings

Seriously.  I actually got up and went right when they opened to make sure I got all the deals.  There was already another crazy coupon lady in there.  I snagged some of the last things on the shelves, so it was totally worth my Sunday sleep in sacrifice.

Now does that deal make you wanna coupon or what?! ;)
   

Saturday, April 13, 2013

Fresh Brewed

After a whole week of drilling I was finally able to roast some coffee today.  Say what?  Drilling?  Yes I know.  Sounds weird, right?  Well let me show you what I was working so hard on.


That's right.  693.

Chris and I decided for some weird reason (*cough* Emily *cough*) that we wanted to roast our own coffee beans.  We had received some home roasted beans for Christmas from my sister and they were delicious, so why not learn to do it ourselves?  Well once we bought them I realized that we really didn't have any of the required equipment to roast them properly.  I decided that I didn't want to spend any money on purchasing a popcorn popper, so oven roasting it was.  Out came the oldest pan in the drawer and my Chris' power drill.

I got through about two when I realized what a bad idea it was.  For those of you who know me though, there was no quitting.  Even when I'd only done about 30 before calling it quits for the day and Chris came home and shook his head at me.  By golly, I got up the next morning and did 60!  Then 90 the next day....then...well, you get it.

Today, my friends, today was the day.  I drilled that final hole and cranked that oven up to 500 degrees, then roasted those babies until they cracked and then cracked once more.  I hovered about with a sick feeling in my stomach watching the smoke billow out of the oven.  I thought for sure I had just drilled 693 holes over the past week all to get some burnt coffee beans.  I finally couldn't take it anymore and had to open it to make sure they weren't on fire.  The smoke detector went into a tizzy and I had to run around opening windows and waving kitchen rags.

It was all worth it though, when I removed those beans from the oven, they were a smooth, oily, Pacific Northwest, medium bold brown.

Emily, if you're reading, I hope you are proud.


I even re-used the glass jar you gave us with the Christmas batch.


Cross your fingers they actually taste as good as they look tomorrow morning.

Tuesday, April 9, 2013

Pallet Planter Boxes

Chris was telling me a few months ago about all the stacks of pallets that they have hanging around the building where he works.  I got so excited about all the endless possibilities of what we could make with them.  It's extremely hard to pick out one thing.

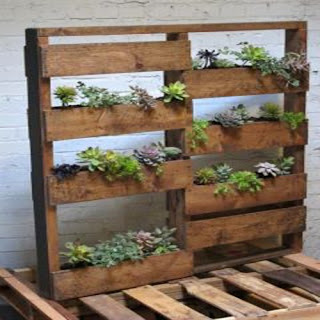
Here are a few of my favorites:


They are all so awesome!

We decided the best thing would be to use a majority of them to create planter boxes for our vegetable gardens this year to clean up the look of the garden and save some dough.  More on those later.

For my fun project I decided to make some mini planter boxes to spruce up the front porch a bit.  Mary sent me this link and it looked nice and easy so I went for it.

So again, I failed to take pictures of the process, my apologies.  I was so excited making these things I couldn't stop to go upstairs and grab the camera.  It was my first project using the miter saw and nail gun all by myself and I felt like such a grown up!

Here is what the first box looked like before it was stained.


The wood was actually in pretty darn good condition.  I was too busy making and not thinking about that whole "big picture, distressed, cool vibe" thing.  I should have thrown some chains and hammers on it to mess them up a bit more and stained before hand.  You live and learn, right?  Next time...
So here is that same box after it received a heavy stain.


Next step was to decide what to put in it.

I found inspiration from this picture in my March edition of Better Homes and Gardens.


I loved the look of the teal pot with coleus plants in it.  I figured the easiest way would be to buy a terra cotta pot and paint it.  I may or may not have gone a little too bright, but I can always tone it down later, right?

Here is the finished pot with the planter box.


I still have to bump up the other pot up and get them filled with pretty flowers, but considering it snowed here today, that may have to wait a few more weeks.

Anyone got some good flower suggestions while we wait?